Solving the GUI framework cannot be initialized error in Miktex

Miktex 2.8 and 2.9 seem to suffer from a known issue with the package manager. Simply put, the package manager GUI will fail and then no packages can be fetched if the Yes or Ask options are selected for the package manager (contrary to some online information, selecting Yes doesn’t seem to work).
The solution isn’t too pretty: Open the mo (miktex options) GUI that’s in the bin folder of the miktex installation folder. For example in Windows 7 this is:
C:\Program Files (x86)\MiKTeX 2.9\miktex\bin>

Then just run mo.exe. IN the General screen, select the “No” option for whether packages should be downloaded automatically.

Here is the difficult part: you now will need to download the necessary packages manually. It’s a pain, but can be done quickly. Simply run miktex and see what package is missing from the error. Using the package manager (also available in mo.exe in the Packages tab), locate the packages and install them.
GIT it in your development

Over the last several years, I’ve played around and used several Source Control systems. Among the Perforce, GIT, Subversion and a few others. I have to say I’m very happy with GIT thus far. Despite the complaints of some, GIT is an excellent system and has saved me from source code hell a few times.
You can find more about git here:
http://git-scm.com/

The tutorials are quite good and can get you up and running quickly.

Once you’ve created the repository, go ahead and created an annotated tag with, for example the name v0.1.
After this, running the “git describe” command will provide you with incremental versioning, which is very much needed when you’re reporting bugs on a
particular commit. Just try giving your colleagues the SHA1 of the particular commits when they ask you the version in which the bug was found. I suspect they’ll be none too pleased, though you might get to figure out who knows what SHA1 is 😀

This automatic versioning is also useful when using a Continuous Integration server such as Hudson, Jenkins, etc.

Create debug first, software later

Have you ever found a software bug and then went back to add printf and other debugging capabilities later?
I think we’ve all done that. However, that approach is way too late. There is one true maxim in software:

Your software has bugs

Given this, the best approach is likely to add debugging capabilities first, then add the actual code later. There are plenty of advantages for this:
1) You’re much more likely to add the debugging prints if you have easy to use debugging functions
2) Issues will happen almost immediately once you start writing code. You will get to writing working code faster if you have a consistent debug method

In Windows/Linux, printf and similar functions are one way to go. Please note that using a good debugger in itself is critical, however, it’s sometimes easier to see
a chain of events happening when it prints. Make sure to use the line number Macros in C whenever possible since they’ll let you know immediately where the error is.

In embedded systems this becomes a bit more tricky. Embedded debuggers provide the ability to use printf across JTAG and this is quite good sometimes, but it might be better to use a separate UART connection. Another good option is that if your system has any kind of flash storage (such as SD card) then print the log information there. This is useful in the long term when you’re not paying attention and everything comes crashing down. You can then have a look and get a better idea of what is going on.

The blog over the last year

Over the last year, I’ve made little changes or additions to the blog due to being so busy with work and family. Some interesting trends developed while I was “away”.
My bandwidth requirements have spiked significantly. My MSP430 shows up as one of the top results in Google. I’ve never publicized it anywhere so I can only assume that users have been posting links to my blog. At 1MB a pop for the PDF, my BW gets quickly eaten up but I’m working to get more.
There have been many of you that have thanked me for the tutorial and I am very happy to know that you find it useful. I really make nothing out of it except knowing that some of
my knowledge about the MSP430 gets passed down.
There have been even more that have clamored for more material. I am happy to say that I’m working on just that. The MSP430 is a device with many features and peripherals, and on top of that I’m hoping to add some practical tutorials on debuggers, compilers, etc. Please feel free to e-mail me with material suggestions or corrections gustavo [at] glitovsky (dot) com

And as always, plenty of spammers have tried to craft intricate messages for me to approve in the Blog. I have to say it probably didn’t work 😀 Sorry!

Using Doxygen

If you haven’t used Doxygen or a similar documentation generator, start using it. If there’s something worse than bad code is bad or uncommented code. Doxygen is so easy to use that there’s really no excuse. There is one exception: there’s not always easy examples of how to use it and nothing really practical. Here’s my attempt at correcting that mistake:

/** \defgroup Example Example
*  @{
*/
/*!
 * \brief Sample Function that’s commented
 *
 * This is an extended description about the function
 *
 * \par More information here is in bold and indented
 *
 * @param param1 is the first parameter
 * @param param2 is the second parameter
 *
 * \return 0 if successful, 1 if failed.
 *
 * \par Example Usage:
 *      doxyFunctionExample1(1, 1);
 */
int doxyFunctionExample1(int param1, int param2)
 {
 return 0;
 }
/** @}*/

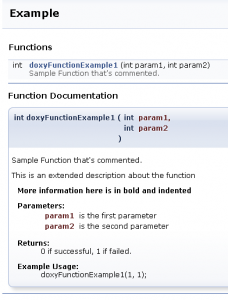
I apologize for the formatting. Using the template above you get the following results:

Doxygen OutputThe example contains a lot of details left out in many Doxygen tutorials/docs and should cover most cases. You can use the \par to create a custom paragraph, such as the example usage one above.

Configuring and Using the MSP430 UART

Embedded applications are nowdays rarely completely standalone. You’ll usually have the system communicate with something, usually a computer. The easiest way to do so is with UART, since there are several USB to UART converter ICs out there such as the FT232 from FTDI Chip.

You still need to configure the UART module of the microcontroller to work. For the MSP430, I’ve added quite a lot of practical information on how to get UART running. Take a look at the UART chapter in my tutorial:

http://www.glitovsky.com/Tutorialv0_3.pdf

The information will allow you to communicate with a computer using the USB port


9/26/2012

I just announced my first release of an open source MSP430 UART driver. If you want to get started using
the MSP430 UART without all the hassles, feel free to give it a try. More information Here

3/16/2014

My company’s website www.argenox.com is now the main resource for MSP430 related tutorial. We have greatly improved the information for the MSP430 UART.

The Software Tradeoff Triangle

Approximately 80% of all embedded systems are delivered late. That is a huge statistic. Software products have a competing aspects of features, schedule and quality. Ideally a product should be delivered on time, with the best quality and the most number of features. That won’t happen and it’s not happening, as noted in the 80%.

It’s interesting to look how some companies behave in this aspect, even if they don’t develop embedded software. Blizzard, which makes Starcraft, Diablo and World of Warcraft, seems to always opt for quality and features. During development they give the usual “It’ll be done when it’s ready”. Their products are arguably some of the best games  in their categories. Fans are willing to wait for that quality, but this is not always possible in other industries.

In some cases, working quality and features have delayed products for a long time. Consider Daikatana, the FPS brainchild of game designer John Romero. The game was delayed for several years and was ultimately released to lackluster reviews. The delay to ensure quality in fact caused more quality and feature problems.

Through these examples we can see that when one of the three aspects is sacrificed (schedule in this case), the other two aspects better be taken care of, at least to an acceptable level. If this won’t happen, the product shouldn’t be developed.

Designing a System? Consider NRE vs. COGS

There are always tradeoffs between Non Recurring Engineering (NRE, or product development costs) and Costs of Goods Sold (COGS, or the cost of the final product). The balance between the two depends on the project. Simple products will require lower COGS. However, never forget about NRE costs. It is possible for you to increase COGS slightly and save a lot of money on NRE. One example of this is an embedded project requiring UART. Assuming your microcontroller or design has no UART capability, you can go either the software or the hardware route. Most will go the software route. Why? obviously because software is cheap (the most erroneous assumption by some).

When you look at software, development is very expensive. Sure, you can bit bang UART and it will work, but to get it to work reliably will require code design, development and debugging. For just a little added cost to COGS (the price of the final product), you can save yourself major headaches, not to mention that you won’t be burdening your microcontroller with handling UART itself.

If you don’t believe it, consider that IBM’s own analysis of hundreds of software projects finds that software development does not scale linearly with complexity. Simpler software costs less.

Nonetheless, there are cases where hardware won’t do. This is especially true when upgrades will be required. UART is standard and won’t require upgrades, but a proprietary algorithm that’s in flux will change.

Free and Open Source MSP430 Debugging

Debugging for the MSP430 has always been complicated. The old mspgcc project incorporated the gdbproxy software, which was partially closed source because of the proprietary deubgging interface.

mspdebug is an open source debugger that allows you to debug the msp430 using common interfaces including the FET430UIF (the standard FET interface), EZ430 and EZ430-RF2500.

Installation and use is a breeze. Simply clone the code using git:

git clone git://mspdebug.git.sourceforge.net/gitroot/mspdebug/mspdebug

Then build

make
sudo make install

sudo is required since mspdebug will want to install in /usr/local/bin.
Once mspdebug is installed, it’s ready for use. For example, lets assume you have a hex file that was compiled using mspgcc or another compiler called “text.hex” and you want to flash it to an EZ430-RF2500 device.

sudo mspdebug rf2500

sudo is again required unless you have permissions for the USB port used for the ez430-rf2500. mspdebug automatically detects an EZ430-RF2500 and connects to it.

The screen will show the following, preceded by a list of useful commands and other relevant information :

Type “help ” for more information.
Press Ctrl+D to quit.
(mspdebug)

As with GDB, you have complete control interactively and you can type commands by writing and pressing ENTER. We can erase the flash, load the hex file and let it run as follows:

(mspdebug) erase
(mspdebug) load test.hex
(mspdebug) restart
(mspdebug) run

Besides working as standalone programmer, there are many other features and mspdebug can operate with GDB similar to what OpenOCD does for ARM devices.
This is incredibly powerful and very easy compared to other alternatives and makes a strong argument for MSP430 programming in Linux.